What is a Load Balancer?
A load balancer is a critical component in distributed systems, responsible for distributing incoming requests across multiple servers to ensure high availability, reliability, and optimal performance.
Load balancing can generally be categorized into two types:
- Path-based load balancing: Routes requests to different servers based on the request path.
- Application-based load balancing: Routes requests based on specific application logic, such as resource utilizaion or round-robin.
In this post, we will focus on application-level load balancing and build one from scratch. To simplify the process, we’ll use a Flask web server as the application backend.
Goal
The objective of this setup is to create a web server that:
- Binds to a specific port.
- Listens for incoming client requests.
- Forwards the requests to a pool of backend servers.
- Sends the response back to the client.
Additionally, we’ll implement different load balancing algorithms (e.g., round-robin, least connections, etc.) to explore how the system handles traffic distribution.
Experimental Setup
To implement our load balancer, we need two main components:
- Backend Servers: These servers will handle the actual client requests.
- Load Balancer: This will manage the incoming traffic and forward it to the backend servers based on the chosen algorithm.
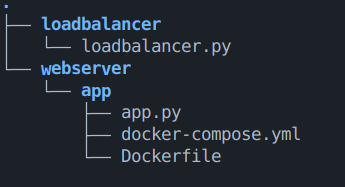
The easiest way to simulate multiple backend servers is by spinning up multiple containers using Docker. This approach allows us to quickly create isolated instances of Flask servers with minimal configuration. Your final directory structure should look like this:
Web Server Setup
Let’s start by setting up our Flask application to create running web servers.
1. Creating the Flask Application
First, create a folder named webserver/app in your project root directory. Inside that folder, create a file called app.py and import the required libraries:
import os
from flask import Flask
Next, set up the Flask app and create a simple route that returns the server name:
app = Flask(__name__)

@app.route("/")
def hello():
    return f"Hello from {os.environ['APP']}"

if __name__ == '__main__':
    app.run(host='0.0.0.0')
This Flask code creates a web server that returns the name of the server, which is passed as an environment variable. Why use environment variables? We’ll get to that shortly!
Our goal is to build a Docker image and run multiple web services from that image. Now, let’s use Docker to facilitate this.
2. Dockerizing the Flask Application
In the same webserver/app directory, create a Dockerfile with the following contents:
FROM python:3
RUN pip install flask
COPY ./app.py /app/app.py
CMD ["python", "/app/app.py"]
This Dockerfile will install Flask and copy the app.py file into the container. The CMD command ensures that the Flask app is run when the container starts.
3. Building the Docker Image
To build the Docker image, open your terminal and navigate to the webserver/app directory. Run the following command:
docker build -t server .
This command builds the Docker image and tags it as server. Now we have a reusable image to run multiple web servers.
4. Running Multiple Backend Servers
To run multiple backend servers using the same image, we’ll use environment variables to distinguish between the servers. We will also need a docker-compose.yml file to manage multiple services.
Create the docker-compose.yml file in the same directory (webserver/app) with the following content:
version: '3'
services:
  server1:
    image: server
    environment:
      - APP=Server 1
    ports:
      - "8081:5000"
  server2:
    image: server
    environment:
      - APP=Server 2
    ports:
      - "8082:5000"
  server3:
    image: server
    environment:
      - APP=Server 3
    ports:
      - "9081:5000"
  server4:
    image: server
    environment:
      - APP=Server 4
    ports:
      - "9082:5000"
Notice, the use of environemnt variable APP are different for each container. This allows us to distinguish which backend server is serving through different ports.
This configuration defines four services, each running an instance of the server image. The environment variable APP is used to distinguish each server, and Flask’s default port (5000) is mapped to different external ports (8081, 8082, 9081, and 9082).
5. Running the Servers
To start all the services defined in docker-compose.yml, run the following command:
docker compose up -d
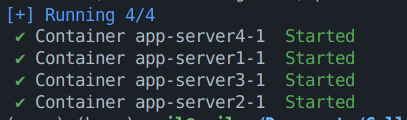
This will launch all four backend servers in the background. You can now access them by visiting the corresponding ports in your browser (e.g., http://localhost:8081, http://localhost:8082, etc.).
The completion should look something like this:
Load Balancer Setup
Now, let’s create a simple load balancer using Flask that will distribute incoming requests to multiple backend servers.
1. Setting up the Load Balancer
Create a new folder in your working directory called loadbalancer.
We will start by implementing a round-robin load balancing strategy. To make this work, we need a server that binds to a given address, listens for requests, and forwards them to a pool of backend servers according to the load balancing algorithm.
2. Implementing the Load Balancer
Here’s the code for the basic load balancer setup:
# import required libraries
from flask import Flask, request, Response
import requests

# Initialize Flask app
app = Flask(__name__)

# List of available backend servers
backend_servers = [
    'http://localhost:8081',
    'http://localhost:8082',
    'http://localhost:9081',
    'http://localhost:9082'
]

# Index to track the current backend server for round-robin
current_index = 0
Now we define the load_balancer function that will log the incoming request, select the optimal backend server, forward the request to it, and return the response back to the client.
@app.route("/", methods=["GET", "POST", "PUT", "DELETE", "PATCH"])
def load_balancer():
    # Log incoming request
    print("Received request from", request.remote_addr)
    print(f"{request.method} {request.path}")

    # Select the next backend server
    backend_server = get_next_server()
    print(f"Forwarding request to {backend_server}")

    # Forward the request to the backend server
    try:
        forwarded_response = requests.request(
            method=request.method,
            url=f"{backend_server}{request.full_path}",
            headers=request.headers,
            data=request.get_data(),
            cookies=request.cookies,
            allow_redirects=False
        )

        # Forward the response back to the client
        response = Response(
            forwarded_response.content,
            status=forwarded_response.status_code,
            headers=dict(forwarded_response.headers)
        )
        return response

    except requests.exceptions.RequestException as e:
        print(f"Error forwarding request: {e}")
        return Response("Error forwarding request.\n", status=502)
3. Defining the Load Balancing Algorithm
The load balancing strategy is implemented in the get_next_server function. This function uses a round-robin approach to select the next server in the list.
def get_next_server():
    """Round-robin load balancing strategy."""
    global current_index
    server = backend_servers[current_index]
    current_index = (current_index + 1) % len(backend_servers)
    return server
This function cycles through the backend servers in the backend_servers list, ensuring that each server gets a fair share of requests.
4. Running the Load Balancer
Finally, we need to add the following lines to start the load balancer on port 8000:
if __name__ == "__main__":
    print("Starting load balancer on port 8000")
    app.run(host="0.0.0.0", port=8000)
5. Final Code
The complete code for the load balancer will look like this:
#loadbalancer.py
from flask import Flask, request, Response
import requests

app = Flask(__name__)

# List of backend servers
backend_servers = [
    ('http://localhost:8081'),
    ('http://localhost:8082'),
    ('http://localhost:9081'),
    ('http://localhost:9082')
]
# Index to track the current backend server for round-robin
current_index = 0

def get_next_server():
    """Round-robin load balancing strategy."""
    global current_index
    server = backend_servers[current_index]
    current_index = (current_index + 1) % len(backend_servers)
    return server

@app.route("/", methods=["GET", "POST", "PUT", "DELETE", "PATCH"])
def load_balancer():
    # Log incoming request
    print("Received request from", request.remote_addr)
    print(f"{request.method} {request.path}")

    # Select the next backend server
    backend_server = get_next_server()
    print(f"Forwarding request to {backend_server}")

    # Forward the request to the backend server
    try:
        forwarded_response = requests.request(
            method=request.method,
            url=f"{backend_server}{request.full_path}",
            headers=request.headers,
            data=request.get_data(),
            cookies=request.cookies,
            allow_redirects=False
        )

        # Forward the response back to the client
        response = Response(
            forwarded_response.content,
            status=forwarded_response.status_code,
            headers=dict(forwarded_response.headers)
        )
        return response

    except requests.exceptions.RequestException as e:
        print(f"Error forwarding request: {e}")
        return Response("Error forwarding request.\n", status=502)

if __name__ == "__main__":
    print("Starting load balancer on port 8000")
    app.run(host="0.0.0.0",port=8000)
6. Testing the Load Balancer
First we need to run the loadbalancer.py program. Use suitable command to run the loadbalancer.py. This will create a web server that is bind on localhost:8000 and act as loadbalancing agent.
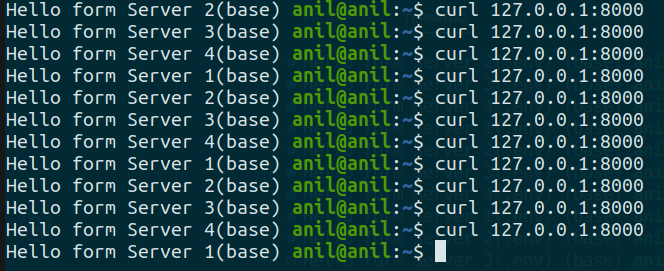
To test the load balancer, you can use the curl command to make HTTP requests to http://localhost:8000. Each time you send a request, the load balancer will forward it to the next backend server in the round-robin sequence.
curl http://localhost:8000
Each subsequent request should be forwarded to a different backend server, as per the round-robin algorithm.
In the next part, we will implement advanced load balancing algorithms, such as Least Connections and IP Hashing, to optimize traffic distribution. Additionally, we will define classes for improved modularity, allowing us to easily extend the functionality and improve the maintainability of the load balancer. These improvements will help us create a more robust and scalable solution suitable for production environments.
Stay tuned for more details on these advanced techniques and how to structure the code for greater flexibility and scalability!